
In previous version of SharePoint we had some out-of-box web parts readily available for displaying stuff from your mail account such as
- My Calendar
- My Contacts
- My Tasks
- My Inbox
- My Mail Folder
But when Microsoft released SP 2013 the Outlook Web Access web parts were missing, it appears that Microsoft had already foreseen the era of REST APIs, and had completely dropped the idea of getting those web parts back in SharePoint (after SP 2010). For a short span Microsoft allowed us to use a Page Viewer web part to access Outlook but even that didn’t last long.
Unfortunately today we don’t have out-of-box functionality to access the Outlook services, but we are fortunate enough to build our own functionality to get hold of Outlook/Exchange using Office365 APIs for Outlook.
To access Outlook services in SharePoint Online we need following steps.
- Creating and Registering new Azure Active Directory (AAD) app.
- Adding proper permissions to allow accessing Outlook items.
- Updating the app Manifest.
- Code to get the Outlook items and displaying them in our SharePoint page.
Make sure that you have a Office365 subscription with Azure AD and Exchnage setup. To get this done I used AngularJS v1.x and an Angular library of Active Directory Authentication Library for Javascript( ADALjs ) called as ADAL-Angular. ADAL js is a javascript library that helps you sign-on AAD users or connect with APIs protected using AAD.
Script CDN ADAL: https://secure.aadcdn.microsoftonline-p.com/lib/1.0.0/js/adal.min.js
ADAL Angular: https://secure.aadcdn.microsoftonline-p.com/lib/1.0.0/js/adal-angular.min.js
- Creating and Registering Azure AD app.
- To create an AAD app you navigate to https://portal.azure.com and navigate to Azure Active Dirctory >> App registrations >> Click New application registration

- Fill in the Name, choose Application type Web app/API and Sign-on URL should be any valid URL where user can sign in to use the app in case of SharePoint online it can simply be like https://mysite.sharepoint.com. Click create at the bottom of panel to create app.

In the Settings blade find the Reply URL tab and add the URL to page in SharePoint where we will be adding our angular code,

NOTE: Its important that this URL is correct as once the user is authenticate by AAD he will be redirected to this URL (You can also update this field later once you add your code to SharePoint).
2. Adding proper permissions to allow accessing Outlook items.
- Next on we will have to give our app correct permissions to allow it retrieve the data. Once you click on Requested permissions you will see Windows Azure Active Directory listed with access to sign in and read current logged in user’s profile. Leave it as it is and click on Grant Permissions and click Yes.

- Now click on Add present along side Grant Permission command, followed by Select an API and Now here’s a something funny I just came across that you can access your Outlook items by selecting either Office 365 Exchange Online APIs as well or Microsoft Graph APIs. After searching internet thoroughly I came across this answer on Stack Overflow and was convinced to choose Office 365 Exchange Online APIs.

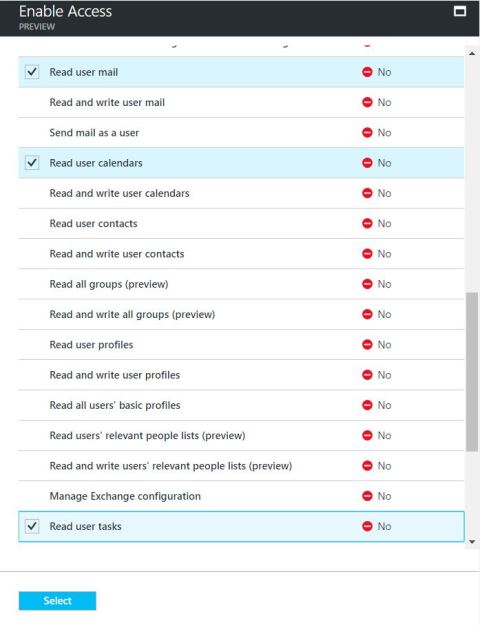
- Our app would be reading user emails, tasks and calendar for now so go ahead and select the permissions under Enable Access blade click Select and click Done.
And we are done with registering our App in AAD with appropriate permissions.
NOTE: If you don’t provide these permission you will get an runtime error by adal saying “The user or Administrator has not consented to use application with <your app id>”

3. Updating the app Manifest.
- This is an important step, by default the apps created in AAD are not enabled for OAuth2 implicit grant, you need to explicitly opt for it and hence its important to make this change in our app’s manifest.
- Go to the app settings again and click on edit manifest to set the oauth2AllowImplicitFlow to true.

Now save the settings and app, we are done with all the AAD stuff and its time for SharePoint to take over.
4. Code to get the Outlook items and displaying them in our SharePoint page.
Lets start with Front end. As i mentioned we would be using AngularJS I have created my template using the same.
<!DOCTYPE html>
<html ng-app="o365CorsApp">
<head>
<title></title>
<script type="text/javascript" src="https://ajax.googleapis.com/ajax/libs/angularjs/1.3.15/angular.min.js"></script>
 <script type="text/javascript" src="https://ajax.googleapis.com/ajax/libs/angularjs/1.3.15/angular-route.min.js"></script>
<script type="text/javascript" src="https://secure.aadcdn.microsoftonline-p.com/lib/1.0.0/js/adal.min.js"></script>
 <script type="text/javascript" src="https://secure.aadcdn.microsoftonline-p.com/lib/1.0.0/js/adal-angular.min.js"></script>
</head>
<body>
<h1>Outlook Demo</h1>
<div ng-view></div>
<script type="text/javascript" src="../SiteAssets/App/Scripts/app.js"></script>
</body>
</html>
<div class="container">
<h2>Calendar events</h2>
<ul>
	<li ng-repeat="calendarEvent in calendarEvents">{{calendarEvent.Subject}}</li>
</ul>
<h2>Messages</h2>
<ul>
	<li ng-repeat="message in messages">{{message.Subject}}</li>
</ul>
<h2>Tasks</h2>
<ul>
	<li ng-repeat="task in tasks">{{task.Subject}}</li>
</ul>
</div>
Its quite easy to understand the HTML templates, so let me just explain what App.js does here.
- Initialize: we need to include ADAL module
var o365App = angular.module("o365App", ['ngRoute', 'AdalAngular']) - We pass the adalAuth provider to app config
o365App.config(['$routeProvider', '$httpProvider', 'adalAuthenticationServiceProvider', function ($routeProvider, $httpProvider, adalProvider)
3. We define the route as usual, except here we add one important parameter requireADLogin: true
4. Initialize the Auth provider with appropriate details and bind it with httpprovider
‘use strict’;
var o365App = angular.module(“o365App”, [‘ngRoute’, ‘AdalAngular’])// loading the ADAL JS Angular module
o365App.config([‘$routeProvider’, ‘$httpProvider’, ‘adalAuthenticationServiceProvider’, function ($routeProvider, $httpProvider, adalProvider) {
$routeProvider
.when(‘/’,
{
controller: ‘HomeController’,
templateUrl: 'https://mstnd809866.sharepoint.com/SiteAssets/App/Views/template.html',
requireADLogin: true
})
.otherwise({ redirectTo: ‘/’ });

var adalConfig = {
tenantid:”mytenant.sharepoint.com”, //or optionally you can add Id of your Azure tenant
clientId: ‘azure app id created by you’,
extraQueryParameter: ‘nux=1’,
endpoints: {
"https://outlook.office.com/api/v2.0":"https://outlook.office.com/",
}
};
adalProvider.init(adalConfig, $httpProvider);
}]);
o365App.factory(‘o365CorsFactory’, [‘$http’, function ($http) {
var factory = {};

$http.defaults.useXDomain = true;

factory.getCalendarEvents = function () {
return $http.get('https://outlook.office.com/api/v2.0/me/events?$top=10');
}

factory.getMessages = function () {
return $http.get('https://outlook.office.com/api/v2.0/me/MailFolders/Inbox/messages?top=10');
}

factory.getTasks = function(){
return $http.get('https://outlook.office.com/api/v2.0/me/tasks?$top=10');
}

return factory;
}]);
o365App.controller(“HomeController”, function ($scope, $q, o365CorsFactory) {

$scope.messages = [{ Subject: “Loading…” }];

o365CorsFactory.getMessages().then(function (response) {
if( response.data.value.length>0)
$scope.messages = response.data.value;
else
$scope.messages =[{ Subject: “No mails found” }];
});

$scope.calendarEvents = [{ Subject: “Loading…” }];
o365CorsFactory.getCalendarEvents().then(function (response) {
if( response.data.value.length>0)
$scope.calendarEvents = response.data.value;
else
$scope.calendarEvents =[{ Subject: “No events found” }];
});

$scope.tasks = [{ Subject: “Loading…” }];

o365CorsFactory.getTasks().then(function (response) {
if( response.data.value.length>0)
$scope.tasks = response.data.value;
else
$scope.tasks =[{ Subject: “No tasks found” }];
});
});
That’s all we have our code ready. Go ahead create a page in SharePoint with a content editor web part on it edit the, web part and add URL of outlook.html to Content link URL field. Save the page and Eureka! you just did it.
Your output will look close to below image except it will display items from your Outlook account


I am getting below error :
” needs permission to access resources in your organization that only an admin can grant. Please ask an admin to grant permission to this app before you can use it.”
I have added all the above permission in Azure app. Is there are any more permission required?
LikeLike
For first time use Global/Tenant admin to login to the app once its approved other users should not get this error
LikeLike
Yes I did the same. I had missed that step before.
LikeLike